
Daisy Puffagon Tutorial
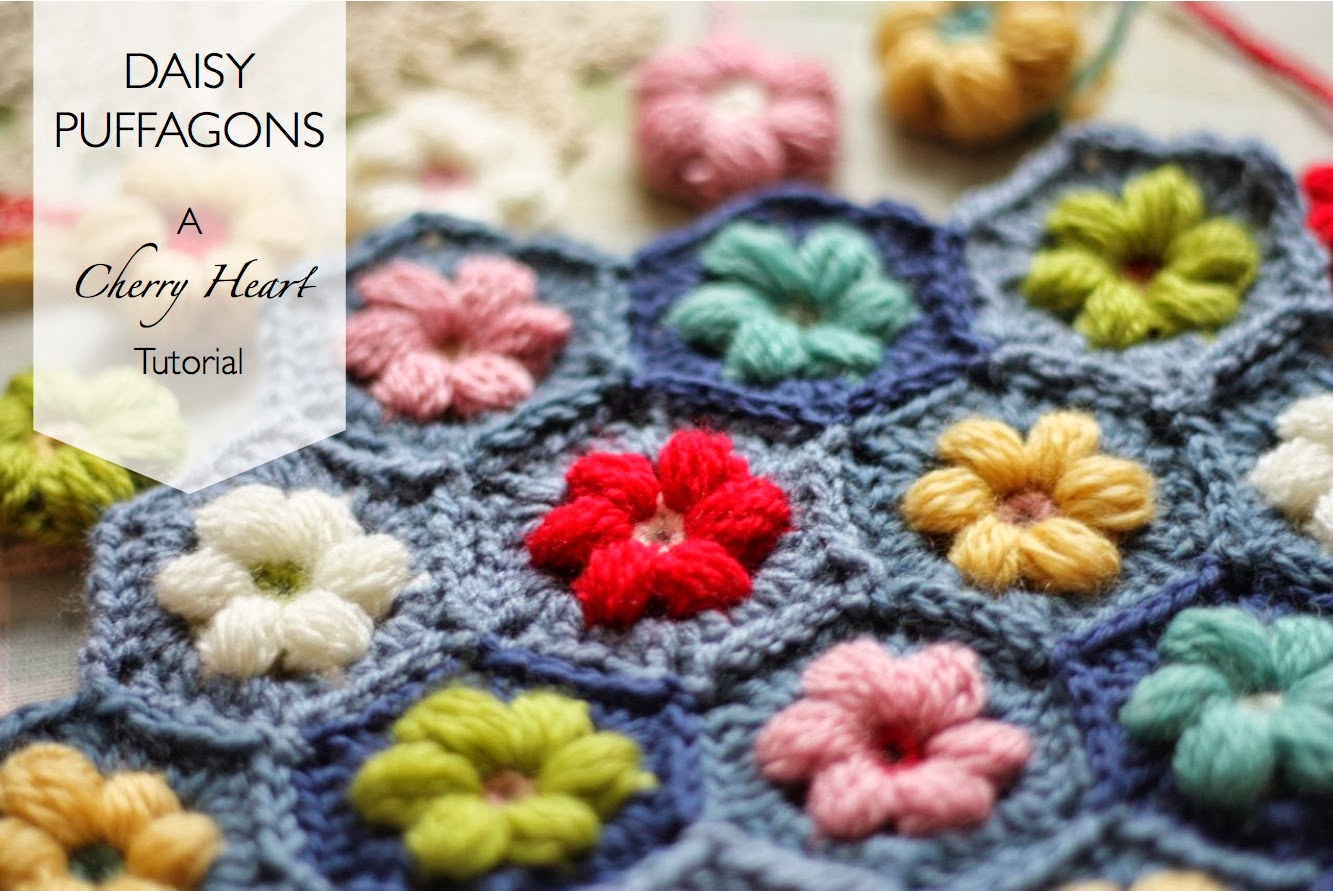
★☆☆ - Beginner
You will need:
Any yarn you wish to use.
I’d recommend using one hook size down from the recommend hook size for your yarn.
(I used DK yarn with a 3.mm/USA D hook)
Crochet Terms:
This pattern is written in UK terms.
American terms are given below in bold.
British (American)
sp - Space
ss - Slip Stitch (Slip Stitch)
ch - Chain (Chain)
dc - Double (Single)
htr - Half Treble (Half Double)
tr - Treble (Double)
dtr - Double Treble (Treble)
WRITTEN PATTERN: Abbreviated instructions can be found at the end of the tutorial.
JOIN AS YOU GO: Find out how to join the Puffagons as you make them with the 'Joining Daisy Puffagons' tutorial.
I'm quite pleased with how 'seamless' I managed to make these look. There's a couple of tricks I used to try and disguise the beginning and end of rounds nicely, so even if you're happy to just follow the written instructions, it might be worth a quick look through the tutorial first as I'll explain all these tips here.

I like to start of these little puffs with a magic loop. If you're not too sure how to start one, see the beginning of my Mix and Match Flowers Tutorial.
So, assuming we've now all got a magic loop, let's begin.
ROW ONE
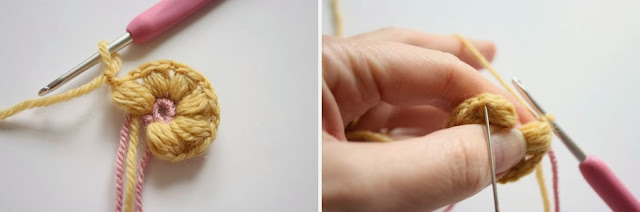
First of all, make 1 chain and then make 6 double crochets (dc) into the loop.
 Once that's done we need to close up the circle.
So take the waste end of the yarn (not the one still attached to your yarn ball) and pull it up until the stitches form a circle.
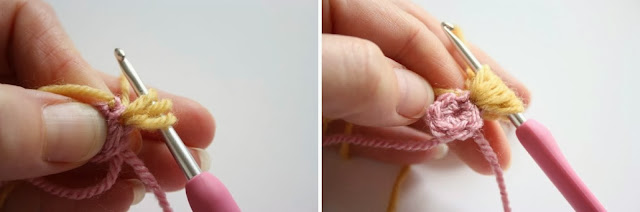
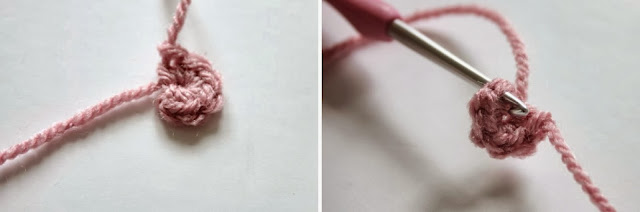 It should look like this (left pic). Normally I'd tell you to make a slip stitch (ss) into the 1st dc of the round to close up the circle, but to get that 'seamless' look we're going to do something a little different.
Cut your yarn and using your hook, pull the end of the yarn until the end comes through the stitch.
Now we're going to just pull the end of the yarn through that first dc of the round. See where the hook is? That's where the yarn end has to go. You can use a needle to thread the yarn through if you like, or if you are lazy like me, you can do it with your hook like I do:
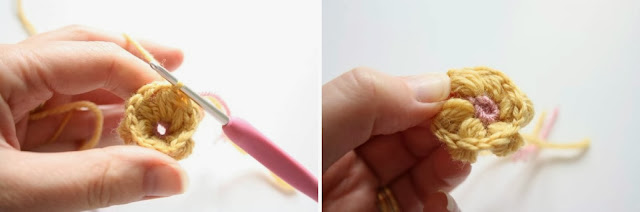
Inserting the hook into the back of the stitch, grab the yarn with your hook and pull it through the stitch.
So now it should look like this. A nice circle of 6 stitches and if you pull that end up nice and tight you can barely see where the end threads through the stitch. Perfect.
To start the next round we need to attach a new colour yarn. The best way I found to do it, was to attach the new colour to the last dc of the first round. The one I'm pointing to with the needle in the right hand picture.
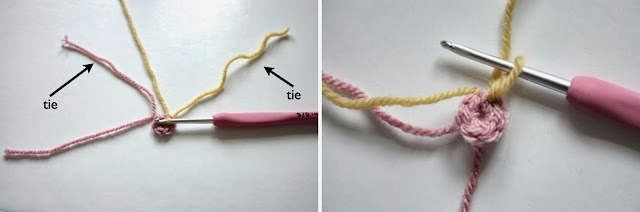 To keep the 'seamless' look I tied the new yarn onto the end of the old yarn nice and tight. This means that the first and last stitch of the ROUND ONE stay nice and close together and you can't see where the join is.
So, bring a loop of your new colour through the dc I indicated above and then, leaving your hook in place, tie the end of the new colour to the end of the old colour. Make sure you get the end you just threaded through the dc stitch, not the one coming out of the middle of the magic loop. (It's easy for them both to get muddled and you want the right one or it won't stay nice and tight!)
ROUND TWO
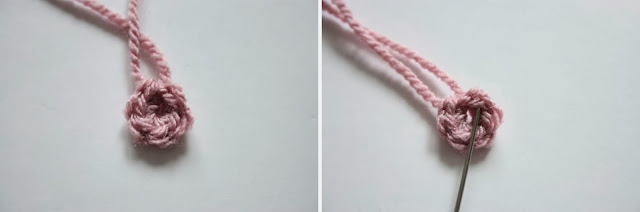
Ok, to begin this round we need to start with a puff stitch. Normally these begin by making a number of chains to get up to the height you would like the puff stitch to be at. I don't like to see these chains though, so I'm going to do it slightly differently.
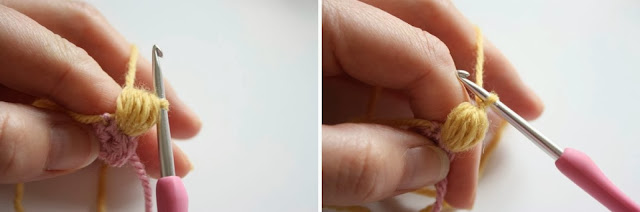
Pull the new colour up through the stitch a little more so that you have a big loop on your hook. You want to pull it up to roughly the same height as a treble stitch would be. Don't worry, it won't have to be exact. See on the right hand picture above, I have a huge, loose loop on my hook?
 Now we'll start the 4 treble puff stitch (4tr puff). If you're not familiar with puff stitches, here's how:
Wrap the yarn over your hook, as if making a treble stitch, then working into the same stitch, wrap the yarn over the hook again, pull the yarn through and keep pulling until you hook is the same height as the first loop we made. That's 1 of the 4 trebles that will need to make up our puff.
So, repeat that same action another 3 times to make the remaining 3 trebles of the puff.
Once that's done, you should have a whole load of big loops on your hook as shown in the right hand picture.
 To finish the puff stitch off, you need to wrap the yarn over your hook and then pull it all the way through the loops on the hook. You now have one loop on your hook.
Wrap the yarn again and pull through the loop on your hook to close the puff together and finish the stitch.
 Now make 1 chain.
Now you're ready to make another puff stitch into the next dc of Round One.
So, wrap the yarn over as if to make a treble and put the hook into the stitch.
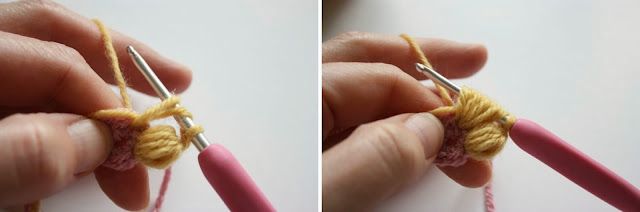 Wrap the yarn over again and pull through the stitch and keep pulling until you reach roughly treble stitch height. (See left hand picture)
That's your first treble of the puff again, so repeat that process 3 more times for the other 3 trebles that make up the puff stitch.
Finish the puff stitch by wrapping the yarn over the hook and pulling it through all the loops on the hook and then wrap the yarn over again and pull through the loop on your hook to finish the stitch.
Then make 1 more chain.
This is what you should have so far. Two nice big fat puff stitches with 1 chain in between. All you need to do now is repeat the same thing round the circle.
Do the same thing in each dc of the round. Make a puff, then chain 1.
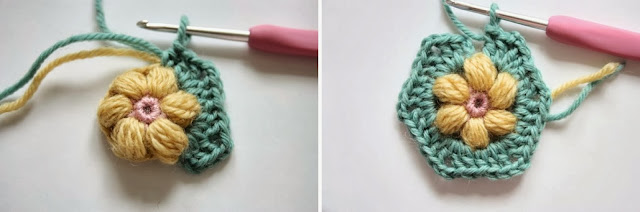
Once you've worked your way around, it should look like this. Now we need to close up the circle.
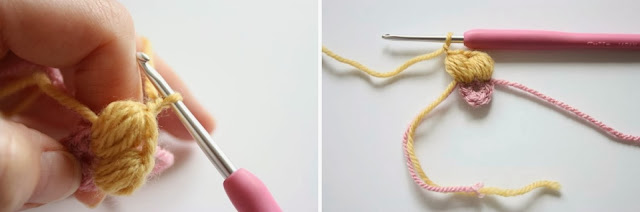
So after your last '4tr puff and 1 chain' is complete, we need to make a slip stitch into the top of the first puff stitch. See where the needle is pointing in the right hand picture above?
It kind of makes the flower scrunch up a bit as you do it, but don't worry about that. Once you've made your slip stitch cut the yarn.
That's your puffy daisy made. Just push it up it the middle to force it the right way round.

So, now the daisy is made, we need to turn it into a hexagon.
Attach a new colour yarn to the same puff stitch in your usual way.

ROUND THREE
Then chain 2. This WON'T count as a stitch, but don't worry about that for now, I'll come back to it at the end of the round.
Then, into the chain space between puffs, make 2 treble crochets.
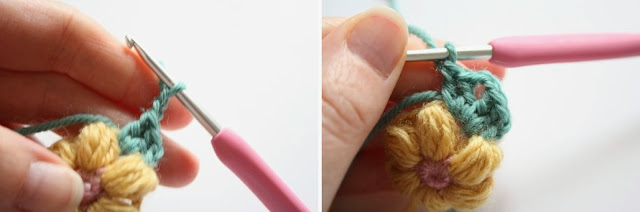 Make 2 chains (these will form a corner).
Then make another 2 treble stitches into that same chain space between puffs.
 Make a half treble crochet into the top of the puff stitch.
Then we make another corner:
So, into the next chain space make, 2 treble crochets, then chain 2, then make another 2 treble crochets.
 Then make a half treble crochet into the top of the puff stitch.
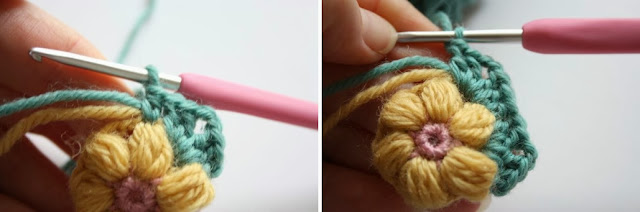
Continue all the way round in the same way. In each chain space make 2 trebles, 2 chains and then 2 trebles and in each puff stitch make a half treble.
Once you are back around to the beginning it should look like this. (right pic)
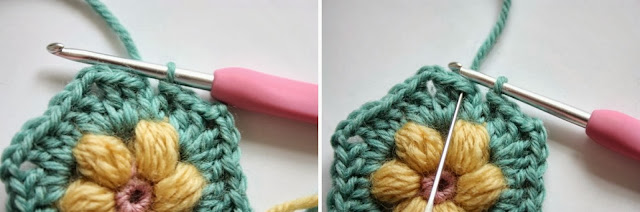 Now, remember that I said that those 2 chains at the beginning don't count as a stitch? Well, again, I liked to do this to make the beginning and end of the round hard to see. Basically we're going to pretend they are not there. So, make a half treble into the top of the puff stitch,the same place that those chains are coming from.
Then, to finish the round, again ignoring those 2 chains, make a slip stitch into the top of the first treble stitch that we made. I've shown it here with my needle in the right hand picture above.
Break the yarn and weave in your ends and that's it!
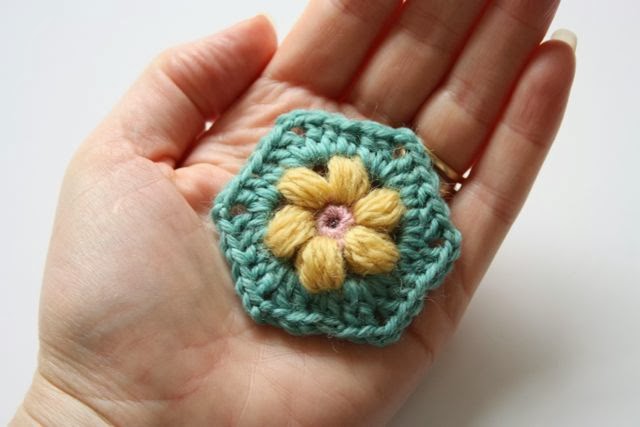
One lovely little daisy puffagon.
Now you know what to do, you can join them to make a cushion like I did, a bag to swing or your arm, string them in a row for bunting, or maybe even a produce a whole blanket full.
I hope you enjoy them and I can't wait to see what you do with them!
If you have any questions or project picture you want to share (yes please!) - come over to Cherry Heart's Cozy Corner, my Ravelry group. I'd love to see you there.
: : WRITTEN INSTRUCTIONS : :
Start with a magic loop.
Round 1: 1ch, 6dc into loop, ss to first dc to form circle. (Or instead of ss, you can follow instructions shown in the tutorial)
Round 2: pull up loop then make a 4tr puff st into dc, *1ch, 4tr puff into next dc, repeat from * around, ss into top of 1st puff.
Round 3: 2ch[doesn't count as first htr], *(2tr, 2ch, 2tr) all into ch sp, 1htr into top of puff, repeat from * around, ending with 1htr in same place as starting ch, ss to top of 1st tr.
: :
Click here to see how to adapt 'Round 3' to joins the puffs as you make them with the 'Joining Daisy Puffagons' tutorial.
JOIN AS YOU GO: Find out how to join the Puffagons as you make them with the 'Joining Daisy Puffagons' tutorial.
I'm quite pleased with how 'seamless' I managed to make these look. There's a couple of tricks I used to try and disguise the beginning and end of rounds nicely, so even if you're happy to just follow the written instructions, it might be worth a quick look through the tutorial first as I'll explain all these tips here.

I like to start of these little puffs with a magic loop. If you're not too sure how to start one, see the beginning of my Mix and Match Flowers Tutorial.
So, assuming we've now all got a magic loop, let's begin.
ROW ONE
First of all, make 1 chain and then make 6 double crochets (dc) into the loop.

So take the waste end of the yarn (not the one still attached to your yarn ball) and pull it up until the stitches form a circle.

Cut your yarn and using your hook, pull the end of the yarn until the end comes through the stitch.
Now we're going to just pull the end of the yarn through that first dc of the round. See where the hook is? That's where the yarn end has to go. You can use a needle to thread the yarn through if you like, or if you are lazy like me, you can do it with your hook like I do:
Inserting the hook into the back of the stitch, grab the yarn with your hook and pull it through the stitch.

To start the next round we need to attach a new colour yarn. The best way I found to do it, was to attach the new colour to the last dc of the first round. The one I'm pointing to with the needle in the right hand picture.

So, bring a loop of your new colour through the dc I indicated above and then, leaving your hook in place, tie the end of the new colour to the end of the old colour. Make sure you get the end you just threaded through the dc stitch, not the one coming out of the middle of the magic loop. (It's easy for them both to get muddled and you want the right one or it won't stay nice and tight!)
ROUND TWO
Ok, to begin this round we need to start with a puff stitch. Normally these begin by making a number of chains to get up to the height you would like the puff stitch to be at. I don't like to see these chains though, so I'm going to do it slightly differently.
Pull the new colour up through the stitch a little more so that you have a big loop on your hook. You want to pull it up to roughly the same height as a treble stitch would be. Don't worry, it won't have to be exact. See on the right hand picture above, I have a huge, loose loop on my hook?

Wrap the yarn over your hook, as if making a treble stitch, then working into the same stitch, wrap the yarn over the hook again, pull the yarn through and keep pulling until you hook is the same height as the first loop we made. That's 1 of the 4 trebles that will need to make up our puff.
So, repeat that same action another 3 times to make the remaining 3 trebles of the puff.
Once that's done, you should have a whole load of big loops on your hook as shown in the right hand picture.

Wrap the yarn again and pull through the loop on your hook to close the puff together and finish the stitch.

Now you're ready to make another puff stitch into the next dc of Round One.
So, wrap the yarn over as if to make a treble and put the hook into the stitch.

That's your first treble of the puff again, so repeat that process 3 more times for the other 3 trebles that make up the puff stitch.

Finish the puff stitch by wrapping the yarn over the hook and pulling it through all the loops on the hook and then wrap the yarn over again and pull through the loop on your hook to finish the stitch.
Then make 1 more chain.
This is what you should have so far. Two nice big fat puff stitches with 1 chain in between. All you need to do now is repeat the same thing round the circle.
Do the same thing in each dc of the round. Make a puff, then chain 1.

Once you've worked your way around, it should look like this. Now we need to close up the circle.
So after your last '4tr puff and 1 chain' is complete, we need to make a slip stitch into the top of the first puff stitch. See where the needle is pointing in the right hand picture above?

That's your puffy daisy made. Just push it up it the middle to force it the right way round.

Attach a new colour yarn to the same puff stitch in your usual way.

Then chain 2. This WON'T count as a stitch, but don't worry about that for now, I'll come back to it at the end of the round.
Then, into the chain space between puffs, make 2 treble crochets.

Then make another 2 treble stitches into that same chain space between puffs.

Then we make another corner:
So, into the next chain space make, 2 treble crochets, then chain 2, then make another 2 treble crochets.

Continue all the way round in the same way. In each chain space make 2 trebles, 2 chains and then 2 trebles and in each puff stitch make a half treble.
Once you are back around to the beginning it should look like this. (right pic)

Then, to finish the round, again ignoring those 2 chains, make a slip stitch into the top of the first treble stitch that we made. I've shown it here with my needle in the right hand picture above.
Break the yarn and weave in your ends and that's it!

One lovely little daisy puffagon.
Now you know what to do, you can join them to make a cushion like I did, a bag to swing or your arm, string them in a row for bunting, or maybe even a produce a whole blanket full.
I hope you enjoy them and I can't wait to see what you do with them!
If you have any questions or project picture you want to share (yes please!) - come over to Cherry Heart's Cozy Corner, my Ravelry group. I'd love to see you there.
: : WRITTEN INSTRUCTIONS : :
Start with a magic loop.
Round 1: 1ch, 6dc into loop, ss to first dc to form circle. (Or instead of ss, you can follow instructions shown in the tutorial)
Round 2: pull up loop then make a 4tr puff st into dc, *1ch, 4tr puff into next dc, repeat from * around, ss into top of 1st puff.
Round 3: 2ch[doesn't count as first htr], *(2tr, 2ch, 2tr) all into ch sp, 1htr into top of puff, repeat from * around, ending with 1htr in same place as starting ch, ss to top of 1st tr.
: :
Click here to see how to adapt 'Round 3' to joins the puffs as you make them with the 'Joining Daisy Puffagons' tutorial.
S x


Your step by step guides are always so helpful. It's a lovely motif, thanks for explaining everything in such detail Sandra x
ReplyDeleteThank you so much for this wonderful pattern, you did a great job with the tutorial.
ReplyDeleteHugs to you,
Meredith
Wow, I am sure that this makes sense to crocheters, but being a newbie, I am in awe! Love the puffagon's!
ReplyDeleteI love hexagons of any kind but crochet ones - <3 <3 <3. Best wishes, Carina
ReplyDeleteYay, I'm so glad you did a pattern. I fell in love with it when you first posted it, I loved the blues you used. Another project to add to my to do list.
ReplyDeleteSally xxx
Aww these are so utterly cute! Thank you so much for this excellent tutorial! :-) xxxx
ReplyDeleteAbsolutely LOVE IT! Thanks for sharing. I am surely going to pin it :-)
ReplyDeletethanks for adding the tutorial and instructions. i can't wait to make my pillow. i hope it looks as adorable as yours.
ReplyDeleteThis is such a gorgeous pattern, thanks for sharing the pattern. It has gone straight to my to do list! Hugs Wendy
ReplyDeletePuffagon! You made my day. What a lovely word. Great tutorial. I might give this a go tonight. I am planning to have some yarn play. Time will tell if I am patient enough to get this right... Puff on! Thank you dear.
ReplyDeletexxx
Annette
So beautiful and sweet! I look forward to trying some soon!! Thanks for sharing and wishing you a lovely weekend!! xo Heather
ReplyDeleteomg!!!
ReplyDeletethanks thanks!!
i want be, love love love it!
Giuliana
These hexagons are lovely! Thank you for this very good tutorial! Kind regards, Marie from Belgium.
ReplyDeleteConfession time - I have been crocheting since 2005 and still have not mastered crocheting in the round. With this tutorial I finally see where I've been making my mistakes and have learned to make a sweet little flower, too! Thank-you so much, you should be teaching!
ReplyDeleteBeautiful thanks for sharing
ReplyDeleteGorgeous and beautiful. Thank you so much for sharing!
ReplyDeleteHooray! I fell in love with these little puffagons when I first saw them, and now I can make my own! Thank you for your wonderful, clear tutorial, Chrissie x
ReplyDeleteYour hexagons are lovely. I have a little squares scarf with puffy flowers. It comes out every autumn. Puff stitch is fun!
ReplyDeletePretty colours! Thank you so... another ooo I want to make one of those to add to the list
ReplyDeleteThank you for writing out this lovely pattern and for the inspiration!
ReplyDeleteWhat a beautifully explained and illustrated tutorial - thank you for sharing, I will be adding this to my list of want-to-makes!
ReplyDeleteGill xx
Love the colours you've used for your tutorial and I will be following it soon to make some of these adorable little puffs. Thanks for posting this Sandra, Sam xx
ReplyDeleteBellissimo lavoro grazie per il tutorial
ReplyDeleteun saluto bina
Dommage que s'en ' s'était pas en français ,mais bravo c'est très beau
ReplyDeleteWonderful wonderful. Sincerest thanks for sharing your time, expertise and passion!!!
ReplyDeleteJust gorgeous, I shared them on my facebook page: https://www.facebook.com/pages/The-Green-Dragonfly/252827191436556 ... I think Im going to have to make some :)
ReplyDelete